
Overview
In this 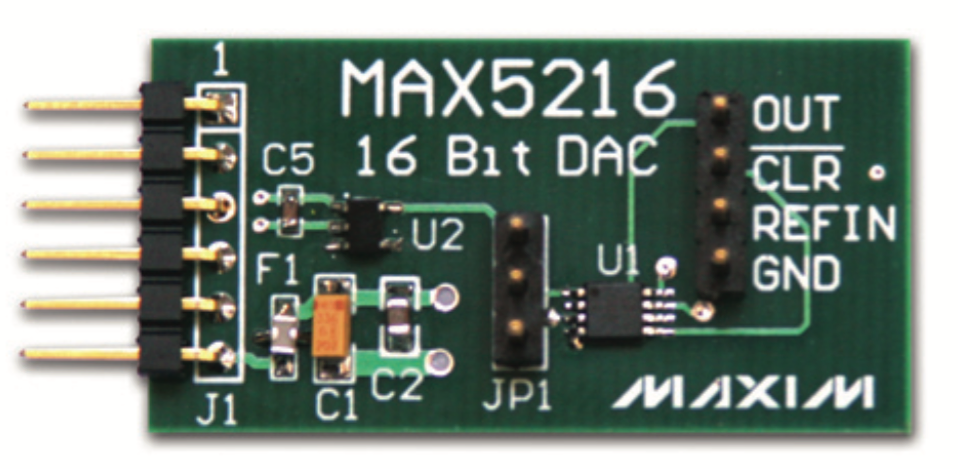 tutorial, I will cover writing a Linux application to control a SPI device connected to the ZedBoard JA1 PMOD connector. In this example, I am using a MAX5216PMB1 16-bit DAC module. Maxim makes an Analog Essentials Collection kit of PMOD boards that I highly recommend. You can buy the kit from Maxim or on DigiKey for about $100.
The code that we will be using does a couple of things. First, it maps the four GPIO units into the address space of the application using the mmap function.
It then has a couple of different modes that you can select using the buttons. One mode allows you to enter values on the keyboard, and then writes the value to the DAC. Another mode computes a sine wave and sends that out the DAC. There are also modes to read the buttons and switch settings, and to write the LEDs.
Accessing the GPIO Registers
The important part of our Linux program is accessing the registers for the GPIO blocks in the FPGA. These registers are memory mapped, so we access them by reading and writing memory. We use the mmap kernel function to map the physical addresses into our running program.
First, we declare pointers to the base address of each GPIO unit and come constants that hold the base physical address of each unit:
static volatile uint32_t *buttons;
static volatile uint32_t *switches;
static volatile uint32_t *leds;
static volatile uint32_t *pmod;

static const uint32_t buttons_addr = 0x41200000;
static const uint32_t leds_addr = 0x41210000;
static const uint32_t switches_addr = 0x41220000;
static const uint32_t pmod_addr = 0x41230000;
To use mmap, we first need to open the device file /dev/mem. We are going to map offsets in this file into our address space. We wrap the open and mmap calls in a function called map_gpios.
void map_gpios(void)
{
 int fd;

if ((fd = open("/dev/mem", O_RDWR|O_SYNC)) < 0)

if (fd < 0) {
 perror("/dev/mem");
 exit(-1);
 }

if ((buttons = mmap(0, getpagesize(), PROT_READ|PROT_WRITE, MAP_SHARED, fd, buttons_addr))
 == MAP_FAILED) {
 perror("buttons");
 exit(-1);
 }

if ((leds = mmap(0, getpagesize(), PROT_READ|PROT_WRITE, MAP_SHARED, fd, leds_addr))
 == MAP_FAILED) {
 perror("leds");
 exit(-1);
 }

if ((switches = mmap(0, getpagesize(), PROT_READ|PROT_WRITE, MAP_SHARED, fd, switches_addr))
 == MAP_FAILED) {
 perror("switches");
 exit(-1);
 }

if ((pmod = mmap(0, getpagesize(), PROT_READ|PROT_WRITE, MAP_SHARED, fd, pmod_addr))
 == MAP_FAILED) {
 perror("pmod");
 exit(-1);
 }
}
Writing to the SPI interface
We also need to create a function which will write to the MAX5216 ADC using its SPI interface. We will declare some constants which indicate the bit positions within the GPIO register that correspond to the three SPI pins that go to the MAX5216 device.
const int SPI_DATA_POS = 1;
const int SPI_CS_POS = 0;
const int SPI_CLOCK_POS = 3;
Unlike the GPIO units for the LEDs, buttons, and switches, the GPIO pins for the PMOD can function as either inputs or outputs. So this unit has a second register which controls the direction of the corresponding pin. For our purposes, we only need to drive the pins as outputs, but we need to initialize the unit by writing zero to this direction control register. Also, the SPI chip select is active low so we need to write that bit to a 1 so that we are not selecting the DAC by default.
void init_spi(volatile uint32_t *port)
{
  /* Set all GPIO pins to output */
  *(port+1) = 0;

  /* Set chip select high (inactive)*/
  *port = 1 <<SPI_CS_POS;
}
Next, we need a function to write to the SPI interface. The interface takes a 24-bit value. There are two control bits in bits 22-23 of the SPI data word which need to be set to 012 to write to the DAC output register. These bits are then followed by 16 data bits and 6 zero bits. Data is captured on the falling edge of the SPI clock. Here is the function to write to the SPI interface:
void write_spi(volatile uint32_t *port, uint16_t value)
{
  int i;
  uint32_t shift = (value << 6)|(1<<22); *port = 0;
  for (i=23; i>= 0; i--) {
    *port =
      (((shift>>i)&1)<<SPI_DATA_POS) | 1<<SPI_CLOCK_POS;
    *port =
      (((shift>>i)&1)<<SPI_DATA_POS);
  }
  *port = 1<<SPI_CS_POS;
}
User inputs
There are five different demo modes for the program. One just lets you type a value to write to the DAC, while another generates a sine output out of the DAC. Other modes let you read button or switch values, or write to the LEDs. We use a function to print a menu of options and read the user selection.
const int value_mode = 1;
const int sine_mode = 2;
const int buttons_mode = 3;
const int switches_mode = 4;
const int leds_mode = 5;
const int exit_mode = 0;

static int select_mode(void)
{
  int mode;
  printf("Select one of the following modes:\r\n");
  printf("%0d) Enter a value to write to the DAC.\r\n",value_mode);
  printf("%0d) Output a sine wave.\r\n",sine_mode);
  printf("%0d) Read the buttons.\r\n",buttons_mode);
  printf("%0d) Read the switches.\r\n",switches_mode);
  printf("%0d) Enter a value to write to the LEDs.\r\n",leds_mode);
  printf("%0d) Exit the demo.\r\n",exit_mode);
  scanf("%d",&mode);
  return mode;
}
Set the DAC output to a value
Here is the function which reads a numeric value and then sets the DAC output to that value:
static void run_value_mode(void)
{
  int value;
  printf("Enter a negative value to exit DAC mode.\r\n");
  do {
    printf("Enter a 16-bit number in decimal: ");
    scanf("%d",&value);
    write_spi(pmod,value);
  } while (value >= 0);
}
Sine output
This function writes a sine wave out the DAC. It runs until the user presses one of the buttons on the ZedBoard.
static void run_sine_mode(void)
{
  int value = 0;
  float angle = 0.0;
  float sine_value;
  float phase_increment;
  const float radians_per_degree = M_PI / 180.0;


  printf("Enter a phase increment in degrees: ");
  scanf("%f",&phase_increment);
  printf("Generating a sine wave with phase increment %0f degrees.\r\n");
  printf("Press any button to end the demo.\r\n");

  phase_increment = phase_increment * radians_per_degree;

  do {
    sine_value = sinf(angle);
    angle += phase_increment;
    value = (sine_value+1.0)*32767.0;
    *leds = value >> 8;
    write_spi(pmod,value);
  } while (*buttons == 0);
}
LEDs, buttons, and switches
These functions set the LEDs, and read the button and switch values:
static void run_buttons_mode(void)
{
  printf("Buttons value is %0d\r\n",*buttons);
}

static void run_switches_mode(void)
{
  printf("Switches value is %0d\r\n",*switches);
}

static void run_leds_mode(void)
{
  int val;
  printf("Enter a value to set the LEDs to: ");
  scanf("%d",&val);
  *leds = val;
}
Main program
And here is the main function to wrap it all together:
int main()
{
  int mode;

  map_gpios();
  init_spi(pmod);

  do {
    mode = select_mode();
    if (mode == value_mode)
      run_value_mode();
    else if (mode == sine_mode)
      run_sine_mode();
    else if (mode == buttons_mode)
      run_buttons_mode();
    else if (mode == switches_mode)
      run_switches_mode();
    else if (mode == leds_mode)
      run_leds_mode();
  } while (mode != exit_mode);

  return 0;
}
Of course you will need some includes at the top of the program. Here they are:
#include <unistd.h>
#include <stdio.h>
#include <fcntl.h>
#include <string.h>
#include <math.h>
#include <stdlib.h>
#include <stdint.h>
#include <sys/types.h>
#include <sys/mman.h>
You can find a link to the file here.
Compiling and running the program
The simplest thing to do to compile the program is to use the command line GCC compiler. If you have set up Petalinux by sourcing the settings.sh script, then you can invoke the compiler and compile the program like this:
% arm-xilinx-linux-gnueabi-gcc max5216pmb1.c -lm -o max5216pmb1
This will build an ARM binary called max5216pmb1, which you can copy to the ZedBoard and run. I usually use the SSH copy command scp to copy the file to the board. You can find out the IP address of the ZedBoard by typing ifconfig in the serial console window once you have logged in.
From the serial console on the ZedBoard first login to the console. Use root as the username and password.
Avnet-Digilent-ZedBoard-2015_4 login: root
Password:
login[918]: root login on 'ttyPS0'
root@Avnet-Digilent-ZedBoard-2015_4:~#
Then issue the command ifconfig.
root@Avnet-Digilent-ZedBoard-2015_4:~# ifconfig
eth0      Link encap:Ethernet  HWaddr 00:0A:35:00:1E:53
          inet addr:10.0.0.59  Bcast:10.0.0.255  Mask:255.255.255.0
          inet6 addr: fe80::20a:35ff:fe00:1e53/64 Scope:Link
          UP BROADCAST RUNNING MULTICAST  MTU:1500  Metric:1
          RX packets:36 errors:0 dropped:0 overruns:0 frame:0
          TX packets:19 errors:0 dropped:0 overruns:0 carrier:0
          collisions:0 txqueuelen:1000
          RX bytes:3902 (3.8 KiB)  TX bytes:3175 (3.1 KiB)
          Interrupt:145 Base address:0xb000

lo        Link encap:Local Loopback
          inet addr:127.0.0.1  Mask:255.0.0.0
          inet6 addr: ::1/128 Scope:Host
          UP LOOPBACK RUNNING  MTU:65536  Metric:1
          RX packets:0 errors:0 dropped:0 overruns:0 frame:0
          TX packets:0 errors:0 dropped:0 overruns:0 carrier:0
          collisions:0 txqueuelen:0
          RX bytes:0 (0.0 B)  TX bytes:0 (0.0 B)

root@Avnet-Digilent-ZedBoard-2015_4:~#
This shows that on my network the IP address of my board is 10.0.0.59.
Copy the executable to the ZedBoard using the scp command. From your workstation type the following:
% scp max5216pmb1 root@10.0.0.59:
You will need to give the root password root.
Then from the console window run the program like this:
root@Avnet-Digilent-ZedBoard-2015_4:~# ./max5216pmb1
The program should then run.
I am unable to download the code from here .They are asking for username and password
Hello!
In this tutorial we set all gpio pins as output, however, i want to set one as input and the rest as output. Can you please tell me what to change in the code to do that, as i am not very good with coding!
Thank you!
okay i don’t know if I’m right, but in the following command,
*(port+1) = 0;
i replaced the 0 with a 4 as the pin that i want as input is on the 3rd position.
and every other pin needs to be set as outputs so they are all 0.
Please let me know if this is the right way to do it.
Yes, setting the corresponding bit in the direction register to one will make that GPIO bit an input. You should then see the input value in the *port register. The input bit will be in the same bit position as the control register. In your case the expression ((*port)&4)?1:0 will give you the value. Let me know if you have more questions. You can also control GPIO values using the Linux GPIO driver. Check out my post discussing that here https://www.beyond-circuits.com/wordpress/2016/08/gpio-with-zynq-and-petalinux/.
Hi, could you sendme the user and password to download the code please? thanks
Sorry about that. A glitch in the permissions. You should be able to download the files now. Let me know if there are still issues.
Hi,
Thanks for these tutorials.
When I run “ifconfig”, there is no ” inet addr:10.0.X.XX Bcast:XXXXXX Mask:XXX.XXX.XXX.X”. did I miss something when I ran petalinux-config ?
I’m using petalinux-2015.4
Thanks in advance
Max
Do you have an Ethernet cable plugged in and will the board receive a DHCP lease when it boots? It sounds like you don’t have an IPv4 address. Can you post the output of the ifconfig command?
I don’t have any Ethernet cable plugged in. I tried to plugged one, but without any result.
Here is some informations during boot:
Configuring network interfaces… udhcpc (v1.23.1) started
Sending discover…
Sending discover…
Sending discover…
No lease, forking to background
done.
Starting Dropbear SSH server: Generating key, this may take a while…
Public key portion is:
ssh-rsa AAA(………..): Registered protocol family 10
TvCHvg2cY0NQXP6rXH/ root@Avnet-Digilent-ZedBoard-2015_4
FingerIPv6: ADDRCONF(NETDEV_UP): eth0: link is not ready
And the ifconfig output:
eth0 Link encap:Ethernet HWaddr 00:0a:35:00:1e:53
UP BROADCAST MULTICAST MTU:1500 Metric:1
RX packets:0 errors:0 dropped:0 overruns:0 frame:0
TX packets:0 errors:0 dropped:0 overruns:0 carrier:0
collisions:0 txqueuelen:1000
RX bytes:0 (0.0 B) TX bytes:0 (0.0 B)
Interrupt:146 Base address:0xb000
lo Link encap:Local Loopback
inet addr:127.0.0.1 Mask:255.0.0.0
inet6 addr: ::1/128 Scope:Host
UP LOOPBACK RUNNING MTU:65536 Metric:1
RX packets:0 errors:0 dropped:0 overruns:0 frame:0
TX packets:0 errors:0 dropped:0 overruns:0 carrier:0
collisions:0 txqueuelen:0
RX bytes:0 (0.0 B) TX bytes:0 (0.0 B)
Hi, awesome tutorials you got here. It is very nice to find a place where one can find all these information so well explained. This topic is not easy and neither is finding such a well explained tutorial about it.
Just as a note, I had to compile the c program with another compiler because the latest version of Vivado has deprecated the compiler you use. I did it with the following command:
arm-linux-gnueabihf-gcc “progam.c” -lm -o “name”
This compiler can be located in either:
PetaLinux/tools/linux-i386/gcc-arm-linux-gnueabi/bin/a
or
Xilinx/SDK/2017.4/gnu/aarch32/lin/gcc-arm-linux-gnueabi/bin
Once more, thank you very much for such a well explained series of tutorial.
Thanks for the kind words and the info on the alternate C compiler. The tutorials are starting to show their age due to the tools moving on. If my professional work ever calms down I will have to go through and update them. Or maybe I should spring for a summer intern.
While running the max5216pmb1 program on the Zedboard, if I choose the LED option, none of the LEDs light after entering the number. The button and switch portions work, and as far as I can tell the DAC and sine wave also works (don’t know what output I am supposed to see without an o-scope connected to the PMOD).
I have checked the address for the LED GPIO in Vivado and it matches the address listed in the .c file. I have even thrown a for loop around the *leds=val; that runs for 1 million iterations just to see if the LEDs are lighting then turning off. Regardless, they still are unresponsive.
Any suggestions on where the bug might be? I am running Vivado 2018.2 on Ubuntu 16.04.
Stu,
Sorry for the long response. Sometimes I forget to check comments on the site.
Have you double checked that the pin assignments in the constraints file are correct? If you don’t map the LED outputs to the correct pins then you would see a problem like this. You should be able to probe with a scope or even a voltmeter to see the outputs change. You should also be able to read the output values from the GPIO register. Also, are you sure the LED GPIO is in output mode? It doesn’t look like the code actually sets this which is a bug.
Have you tried controlling the LEDs through the Linux GPIO driver? Check out my blog post on that.
Let me know if none of these things work.
Thanks,
-Pete
Hi Pete,
No worries about the delayed response; I’ve had plenty of other projects to keep me occupied.
I think we you were right about the constraints being wrong. I was running through the project at http://www.harald-rosenfeldt.de/category/zedboard-tutorials/ and was having difficulties using the LEDs that were automatically hooked up to an AXI GPIO module. It was the first time I had seen an AXI GPIO used with 2 interfaces being on the same module, but I don’t think that is relevant.
For that project, and then today for this project, instead of having Auto Connect connect the GPIO output to the leds_8bits port that it creates, I created my own output port and updated the constraints file myself. After doing those things it worked for both projects.
I tried stepping through the blog post about the Linux GPIO driver with this design. Unfortunately I didn’t get it to work. For some reason the driver identified the direction as IN, which doesn’t make sense and is inconsistent with the block diagram. I don’t know if it is because I’m using Vivado 2018.2 and the example was from 2 years ago and they changed a few things. When I get a chance I might make a project and only include a GPIO for the LEDs and see if it makes more sense with a less complicated.
Do you have any plans for going into more depth on Petalinux device drivers for the Zedboard? I watched these videos https://www.youtube.com/watch?v=H-OKGOMoCSI&list=PLo7bVbJhQ6qwlDa-R6pz7tA7kPzn1s5Ae but wasn’t getting the expected results.
Thanks again,
Stu
Hi Pete,
I have some questions for you:
1) You say that “[…] this unit has a second register which controls the direction of the corresponding pin.” However I checked the datasheet and there’s no mention of this. How do we know the register mappings for any GPIO device?
2) How do you know that these constant values (const int SPI_DATA_POS = 1; const int SPI_CS_POS = 0; const int SPI_CLOCK_POS = 3) correspond to the physical pins of the MAX5216 device? The only thing I see in the datasheet is a truth table (page 13, https://datasheets.maximintegrated.com/en/ds/MAX5214-MAX5216.pdf)
3) Can you explain a bit more the rationale behind this code:
void write_spi(volatile uint32_t *port, uint16_t value)
{
int i;
uint32_t shift = (value << 6)|(1<= 0; i–) {
*port = (((shift>>i)&1)<<SPI_DATA_POS) | 1<>i)&1)<<SPI_DATA_POS);
}
*port =
1<<SPI_CS_POS;
}
Perhaps these are silly questions, but thanks in advance for your reply…
Stu,
Sorry, no plans at the moment for Petalinux device drivers. The tutorials and blog posts usually cover things that I am working on at the moment professionally. That could change though if all of a sudden we find myself in need of a driver.
-Pete
Francesco,
Look at the datasheet for the Xilinx LogiCORE AXI GPIO v2.0. On page 10 you see a register called GPIO_TRI at address offset 0x0004. That controls whether the pin is an input or output. Page 12 shows a detailed description of the register. A zero value for a bit means the corresponding GPIO pin is an output and a 1 means it is an input.
For your second question, these constants are a function of the FPGA design. You need to look at the datasheet for the MAX5216PMB1. Table 1 shows the connections for the PMOD connector. You then follow the ZedBoard schematics to see where the PMOD connector that you are using on the board wires up to the FPGA. You then assign the LOC constraint to the appropriate pin that connects to the PMOD connector and then through to the MAX5216. I connected the chip select signal to GPIO bit 0, MOSI to GPIO bit 1, MISO (which is really not used on this part) to GPIO bit 2, and SCLK to GPIO bit 3. That is how the constants came about. If you used a different mapping then your constants would be different.
For the third question, I apologize since it looks like the code was not formatted correctly. You also didn’t get all of it in the paste into the comment since the rightmost portion got chopped off in the text box the code is presented in. I reformatted the blog post so it should look better now. So the code should really look like this…
void write_spi(volatile uint32_t *port, uint16_t value) { int i; uint32_t shift = (value < < 6)|(1<<22); *port = 0; for (i=23; i>= 0; i--) { *port = (((shift>>i)&1)<>i)&1)<
We set the value shift to the bits we want to shift out. Then we set all the output bits to zero. This brings the chip select signal down to start the transfer and also brings the clock low. The for loop runs 24 times, once for each data bit we need to shift out. We shift the bits most significant bit first. The first statement in the loop sets the output data bit to the correct value, sets the chip select to low (unchanged), and sets the clock to 1. The second statement sets the data bit the same and the chip select the same but sets the clock back to zero. After shifting out all 24 bits we set the chip select back to 1 to complete the data transfer.
I hope this helps. Let me know if anything is unclear.
Thanks,
-Pete
Hello, I am new at this and was having trouble compiling the file. I finally compiled the file as guivi mentioned above: arm-linux-gnueabihf-gcc gpio.c -lm -o gpio. and I am trying to follow the Petalinux user guide UG1144 to create user apps. So i use petalinux-create -t apps –name gpio –enable, the it says that to build the app into the system image execute the following from the project’s directory: petalinux-build -x do_populate_sysroot, which completed successfully after compiling but then do petalinux-build -c rootfs which fails and the error mentions something about the sinf. From what I read it doesnt have a reference to that library, I was wondering if you have done the project this way too and if you could help me fix this error to see if I could follow the steps on the user guide. I dont know that much about petalinux so this tutorial helped a lot but there are still a few steps needed to finish the whole thing.
Thanks, and like they mentioned above, this is one of the best tutorials I’ve seen online. Just a few more details for new users are needed.
Regards,
Jose
Jose,
It sounds like you are not linking with the math library. You should have a -lm on the link command line.
Unfortunately I can’t offer much advice as I don’t build my applications into the linux image. On the embedded linux projects that I am working on we build our application separate from the linux build and they reside on permanent storage on the embedded system.
My suspicion is that you will need to create a custom app template type to pass with the –template argument to petalinux-create that tells it to use the math library.
Let me know what you discover.
Thanks,
-Pete
Wow, never thought you were going to reply that fast. I will definitely try that when I get some time. Midterms coming up!!! Anyway, I will start with a new project, even though I think I follow all the steps correctly, when using ifconfig on the console I couldnt see the inet addr on eth0. Will let you know, hopefully soon, what happens with all of this. Again great tutorial!!!!
If you are not doing an “official” product, you can always build the applications using the gcc tools for ARM which are installed in the petalinux install directory. You can then use SSH to copy your binaries over to the SD card on your board, or just copy them to the SD card directly if you don’t have Ethernet and SSH. Are you using a development board or a custom board?
-Pete
Im using the Zedboard. But maybe forgot to set up something since I dont see the inet addr on eth0 to copy the binary using SSH.
maybe forgot to mention. Im using Ubuntu 16.04 with 2017.4 Xilinx tools. Also using the Zed BSP.
Make sure when you configure the ZYNQ PS that you use the ZedBoard preset and that your Vivado project also is using ZedBoard. If you don’t then the PS may not be configured properly for all the peripherals. You may need to dig around for the board presets for ZedBoard for later versions of Vivado.
-Pete
Will do. Pretty sure they are set since the SD card port, and the UART port are working. Like I said I will start with a new project just to double check the process. I will let you know how it goes. Thanks for the suggestions !
Hello,
Thanks for the tutorial ! Do you use the zed board as master of SPI in this tutorial? Can I ask what changes need to be made to use the zed board in slave mode? Because I’m doing my final project which needs to read data from an AFE device.
Thanks again
Mingfei
You can configure the PS SPI interface as slave mode, but I have never done that. From a hardware point of view, it’s pretty simple. You just set it up in the configuration of the SPI interface on the PS. I have no idea how it works on the software side though. You must end up getting an interrupt saying there is SPI data available. If your PL needs to use the data written over the SPI interface then I would consider writing your own RTL for that. It would certainly be easier than using the PS and writing software to read the value and then writing something in the FPGA.
-Pete
Hi, I understand this blog very well. Thanks for the great tutorial.
I am trying to similar things with maxim2771 which has spi intereface and GPIO interface for data output to save on SD card in BIN format. I am little confused where to start with? I know I need to configure MAXIM2771 using SPI and collect the data using GPIO.
I am just thinking if I could do same steps like you but just replace few things on your setup.
Hardware setup is similar zedboard- pmod B for SPI and Five pins of Pmod A for the data acquisition.
what do you think? I have tried https://linux-sunxi.org/SPIdev
Does not really set the spi registers, and its been a while and had no luck
Sorry for the late response. Are you able to read the SPI data from the Maxim2771 in Linux? If so then you just need to write a program which reads the data and writes it to the SD. If not then you need to focus on reading the data.
Hi, I’m learning with your great tutorials, thanks for them.
I’m having an issue while trying to run the program on the board, I compiled it, send the compiled program into the SD card. I use minicom on Ubuntu as interface, so when the board start everything seems working (I don’t really know what I should have but when I write :
Zynq> version
I get the following message :
U-Boot 2021.01 (Jun 01 2021 – 11:54:06 +0000)
arm-xilinx-linux-gnueabi-gcc (GCC) 10.2.0
GNU ld (GNU Binutils) 2.35.1
So I guess that its working correctly, but I can’t execute the compile program, like you did :
root@Avnet-Digilent-ZedBoard-2015_4:~# ./max5216pmb1
I get this message :
Zynq> ./test
Unknown command ‘./test’ – try ‘help’
(I named the compile program test just to be quicker..)
If you have any idea ? I’ll look on my side if I find the solution, I’ll write under this post.
Thanks again for your huge work,
The Zynq> prompt is the U-Boot prompt and not the Linux prompt. This means that you didn’t boot Linux but are stuck in the boot loader. Likely whatever boot command is programmed into U-Boot is not working. There can be a myriad of reasons why that might be the case. Maybe you just don’t have the right kernel load address programmed in. Check the value of the bootcmd variable in U-Boot and see if it makes sense. See if you can manually load the boot image from SD and then use the bootm command to boot from a memory address.